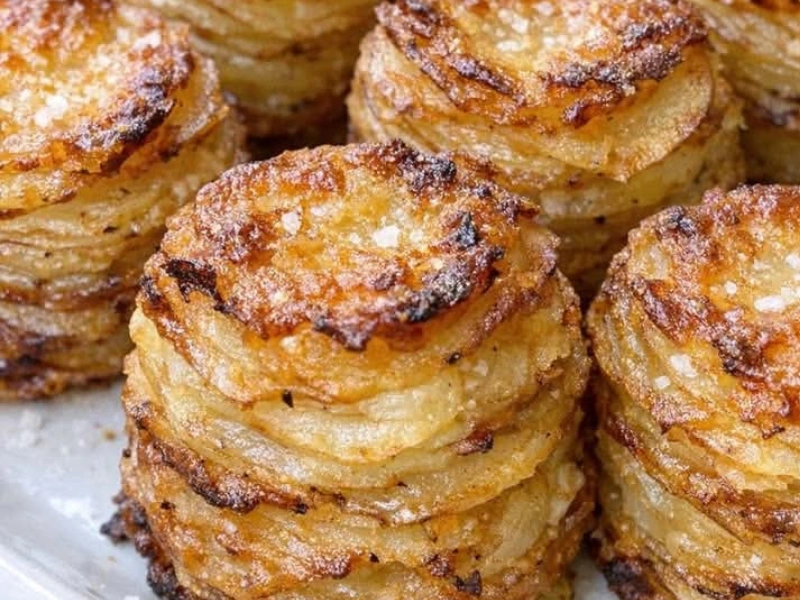
There’s something special about turning a few basic ingredients into a side dish that looks elegant enough for a dinner party. These Crispy Potato Stackers do exactly that. Made with only Yukon Gold potatoes, butter, and sea salt, they bake into golden layered stacks with crunchy edges and soft, buttery centers.
Every bite delivers the perfect mix of textures. The thin potato slices crisp beautifully around the edges while the middle stays tender and creamy. Baking them upright in a muffin tin helps each stack hold its shape while cooking evenly from top to bottom.
These potato stackers may look fancy, but they’re surprisingly simple to make. They fit just as easily on a holiday table as they do beside a weeknight dinner. Whether you serve them with steak, chicken, seafood, or brunch eggs, they always steal the spotlight.
The best part is how the natural flavor of Yukon Gold potatoes shines through. With only butter and salt enhancing the layers, the potatoes become rich, savory, and deeply comforting without needing a long ingredient list.
Why These Potato Stackers Turn Out So Good
The secret is in the way they bake. Instead of spreading potato slices flat on a sheet pan, stacking them vertically inside muffin cups creates layers with multiple textures.
As they cook, the inner slices trap moisture and steam, which softens the potatoes into a creamy center. Meanwhile, the exposed edges crisp up in the oven heat, turning golden brown and slightly caramelized.
Yukon Gold potatoes work especially well because they contain the ideal balance of starch and moisture. They become creamy without falling apart and naturally have a buttery flavor that pairs perfectly with melted butter.
The butter serves two important purposes: it adds flavor and helps separate the slices so every layer crisps individually rather than sticking together.
Ingredients
You only need three simple ingredients:
- 2 pounds Yukon Gold potatoes
- 6 tablespoons unsalted butter, melted
- 1 teaspoon fine sea salt
Optional additions:
- Black pepper
- Garlic powder
- Parmesan cheese
- Fresh herbs like rosemary or thyme
Kitchen Tools
To make these potato stackers, you’ll need:
- Muffin tin
- Sharp knife or mandoline slicer
- Mixing bowl
- Cutting board
- Pastry brush or spoon
A mandoline slicer is especially helpful because evenly thin slices ensure the potatoes cook uniformly.
Crispy Potato Stackers Recipe
Prep Time: 20 minutes
Bake Time: 35–45 minutes
Rest Time: 5 minutes
Total Time: About 1 hour
Yield: 12 stackers
Instructions
1. Prepare the Oven and Potatoes
Preheat the oven to 400°F (200°C).
Wash the potatoes well and dry them thoroughly. Leaving the skins on adds texture, flavor, and helps the stacks hold together.
2. Slice the Potatoes
Using a sharp knife or mandoline, slice the potatoes very thinly, about 1/16-inch thick.
Try to keep the slices as even as possible so they bake at the same rate.
3. Coat with Butter and Salt
Place the potato slices in a large bowl.
Pour the melted butter over the potatoes and sprinkle with sea salt. Toss gently until all slices are coated evenly.
4. Build the Stacks
Lightly grease the muffin tin if desired.
Stack the potato slices vertically inside each muffin cup, filling nearly to the top. Press the stacks down gently so they stay compact while baking.
5. Bake
Place the muffin tin in the oven and bake for 35–45 minutes.
The stackers are ready when the edges are deeply golden and crispy while the centers are fork-tender.
For extra crispiness, broil for 1–2 minutes at the end, watching carefully so the edges don’t burn.
6. Rest Before Serving
Let the stackers cool for about 5 minutes before removing them from the pan.
Use a spoon or small spatula to carefully lift them out and serve warm.
Helpful Tips for Success
- Slice the potatoes thinly and evenly for the best texture.
- Dry the potatoes completely before slicing to help them crisp.
- Don’t overcrowd the muffin tin; airflow helps browning.
- Press the stacks down firmly so they hold together after baking.
- Rotate the pan halfway through cooking for even color.
- Reheat leftovers in the oven rather than the microwave to keep them crispy.
Common Mistakes to Avoid
- Thick potato slices may stay undercooked in the center.
- Excess moisture prevents crisp edges.
- Skipping the resting time can cause the stacks to fall apart.
- Under-seasoning leaves the layers bland.
- Using russet potatoes changes the texture significantly.
Flavor Variations
These potato stackers are easy to customize:
- Add grated Parmesan between layers for a cheesy crust.
- Sprinkle garlic powder or onion powder for extra savory flavor.
- Add rosemary or thyme for an herby finish.
- Use smoked paprika for subtle smokiness.
- Add crushed red pepper flakes for heat.
- Drizzle lightly with truffle oil before serving for a richer flavor.
Serving Ideas
These crispy potato stacks pair beautifully with:
- Roast chicken
- Grilled steak
- Pork chops
- Salmon
- Meatloaf
- Holiday turkey
- Burgers
- Eggs and bacon for brunch
They also make excellent party appetizers because each stack is individually portioned.
Serve them with dipping sauces like garlic aioli, sour cream, or spicy mayo for an extra treat.
Storage and Reheating
Store leftovers in an airtight container in the refrigerator for up to 4 days.
To reheat, place them on a baking sheet and warm in a 375°F oven until hot and crispy again.
Avoid microwaving if possible, since it softens the crisp edges.
Final Thoughts
These Crispy Potato Stackers prove that simple ingredients can create something truly impressive. With nothing more than potatoes, butter, and salt, you get layers of crispy edges and soft, buttery centers that feel both comforting and elegant.
They’re easy enough for a casual family meal but beautiful enough for holidays and gatherings. Once you try them, they’ll quickly become one of those dependable recipes you return to again and again