Let’s be honest—most “sugar-free” desserts don’t live up to the hype. You expect something rich and satisfying, but instead you get a dry, bland bite that makes you regret even trying. If you’ve had that experience, you’re not alone.
This cake, though, is a different story.
If you’re managing diabetes or simply cutting back on sugar, you know how frustrating it can be to skip desserts during celebrations or even everyday moments. The good news? You don’t have to. With the right ingredients and a few smart techniques, you can bake a cake that’s soft, flavorful, and genuinely enjoyable—without causing a sugar spike.
This recipe delivers exactly that: a moist, tender cake with a naturally sweet taste and a satisfying texture. It’s ideal for anyone following a low-carb lifestyle or looking for a better-for-you treat.
Why This Recipe Works
Many low-sugar cakes rely on artificial sweeteners that leave an aftertaste or create a dry texture. This version avoids that by combining almond flour with a small amount of coconut flour for structure and softness.
Instead of sugar, it uses erythritol or monk fruit sweetener—both known for having minimal impact on blood sugar while still providing sweetness.
The result is a cake that feels close to a traditional one: light, moist, and enjoyable.
Ingredients
For the Cake
- 2 cups finely ground almond flour
- 1/3 cup coconut flour
- 1 cup erythritol or monk fruit sweetener
- 1 tsp baking powder
- ½ tsp baking soda
- ½ tsp salt
- 4 large eggs (room temperature)
- ½ cup melted butter (cooled slightly)
- ½ cup sour cream or full-fat Greek yogurt
- 2 tsp vanilla extract
- Optional: ½ cup sugar-free chocolate chips or fresh berries
Optional Frosting
- 225 g (8 oz) cream cheese, softened
- ¼ cup butter, softened
- ½ cup powdered sweetener
- 1 tsp vanilla extract
Instructions
1. Prepare Your Oven and Pan
Preheat your oven to 175°C (350°F). Grease a cake pan and line the bottom with parchment paper for easy removal.
2. Mix Dry Ingredients
In a large bowl, combine almond flour, coconut flour, sweetener, baking powder, baking soda, and salt. Break up any lumps for a smooth batter.
3. Mix Wet Ingredients
In another bowl, whisk together eggs, melted butter, sour cream (or yogurt), and vanilla until smooth.
4. Combine
Add the wet mixture to the dry ingredients and stir gently until combined. Fold in chocolate chips or berries if using.
The batter will be thicker than regular cake batter—this is normal due to the coconut flour.
5. Bake
Pour the batter into your prepared pan and smooth the top. Bake for 25–30 minutes, until golden and a toothpick inserted in the center comes out clean or with a few moist crumbs.
6. Cool
Let the cake rest in the pan for about 10 minutes, then transfer it to a rack to cool completely before adding frosting.
7. Make the Frosting (Optional)
Beat cream cheese and butter until smooth. Add powdered sweetener and vanilla, then mix until creamy. Spread over the cooled cake.
Helpful Tips
- Measure carefully: Spoon flour into the cup and level it off to avoid dryness
- Use room-temperature ingredients: This helps everything blend smoothly
- Don’t overbake: Almond flour cakes can dry out quickly
- Refrigerate leftovers: The flavor often improves the next day
Easy Variations
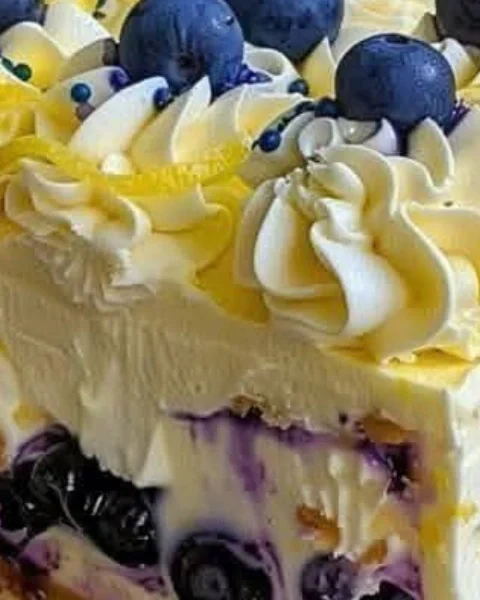
- Lemon blueberry: Add lemon zest and fresh berries
- Chocolate version: Replace part of the almond flour with cocoa powder
- Spiced apple: Add chopped apples and cinnamon
- Cupcakes: Bake in muffin tins for smaller portions
Common Questions
Will it affect blood sugar?
It uses low-glycemic ingredients, but individual responses vary. Monitor as needed.
Can it be frozen?
Yes—wrap slices well and freeze for up to 3 months.
Why is the batter thick?
Coconut flour absorbs a lot of moisture, so this texture is expected.
Can I use other sweeteners?
Dry, granulated alternatives work best. Liquid sweeteners may change texture and carb content.
Final Thought
Choosing a low-sugar lifestyle doesn’t mean giving up desserts. With the right approach, you can still enjoy something sweet, comforting, and satisfying.
This cake proves that healthier baking doesn’t have to feel like a compromise—it can actually be something you look forward to.