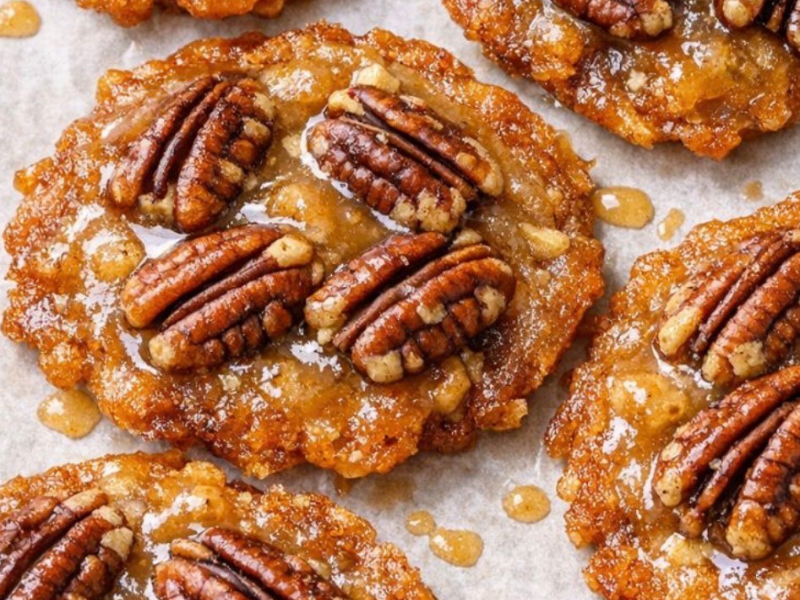
Southern 3-Ingredient Pecan Pralines: A Classic Homemade Candy
If you love old-fashioned Southern sweets, these homemade pecan pralines are a treat worth making. They combine three simple ingredients into a rich, creamy candy filled with crunchy pecans and a delicious caramel flavor.
This traditional Southern favorite is perfect for holiday celebrations, homemade gifts, dessert trays, or whenever you want something sweet without a long list of ingredients. Best of all, you don’t need a candy thermometer to make them. A simple cold-water test helps you determine when the mixture is ready.
Why You’ll Love These Homemade Pecan Pralines
- Only three ingredients: Granulated sugar, heavy cream, and pecan halves are all you need.
- Rich caramel flavor: The sugar and cream create a delicious, buttery-tasting sweetness.
- Creamy with a little crunch: Every bite combines smooth candy with toasted pecans.
- No special equipment required: You can make them without a candy thermometer.
- Perfect for sharing: These candies make thoughtful homemade gifts and are great for holiday gatherings.
- Easy on the budget: The ingredient list is short and simple.
- A Southern classic: Their old-fashioned flavor brings a nostalgic touch to any dessert table.
- Makes plenty to enjoy: One batch yields approximately 18–24 pralines.
Ingredients You’ll Need
You only need three ingredients for this easy pecan candy recipe.
- 2 cups granulated sugar – Provides the sweetness and forms the caramel base.
- 1 cup heavy cream – Gives the candy its rich flavor and creamy texture. Heavy cream is recommended for the intended consistency.
- 2 cups pecan halves – Add the signature nutty flavor and satisfying crunch. Toast them lightly beforehand if desired.
How to Make Southern Pecan Pralines
Follow these simple steps to prepare your homemade pralines.
Step 1: Prepare Your Baking Sheet
Line a large baking sheet with parchment paper and place it near the stove. Set out a heat-resistant spoon and a small bowl of cold water for testing the candy.
Tip: Get everything ready before cooking. Once the mixture reaches the right stage, you’ll need to work quickly.
Step 2: Mix the Sugar and Cream
Add the granulated sugar and heavy cream to a heavy-bottomed saucepan, preferably one with a capacity of about 3 quarts. Stir gently until the sugar is evenly moistened.
Tip: A heavy-bottomed pan helps distribute heat more evenly and reduces the chance of scorching.
Step 3: Bring the Mixture to a Simmer
Place the saucepan over medium heat. Stir frequently at first to help the sugar dissolve. Once the mixture begins simmering steadily, reduce the stirring and occasionally swirl the pan gently.
Tip: After the sugar dissolves, avoid excessive stirring because it can encourage unwanted sugar crystallization.
Step 4: Cook Until Golden and Thick
Continue cooking at a steady simmer or gentle boil for approximately 8–12 minutes, adjusting the heat as necessary. The mixture should gradually thicken and develop a deep golden caramel color.
You’ll notice the bubbles becoming slower and heavier, while the mixture begins coating the back of a spoon.
Tip: Keep a close eye on the color. Caramel can go from perfectly golden to burnt in a short time.
Step 5: Check the Soft-Ball Stage
Carefully place a small spoonful of the hot mixture into your bowl of cold water. Allow it to cool briefly, then check whether it forms a soft, flexible ball that holds together when pressed.
If the mixture dissolves or remains too loose, continue cooking for another 1–2 minutes before testing again.
Tip: This stage is essential for achieving the characteristic creamy texture of pralines. Be careful when handling hot sugar, as it can cause serious burns.
Step 6: Stir in the Pecans
Once the mixture reaches the soft-ball stage and has developed a rich golden color, remove the saucepan from the heat. Immediately add the pecan halves and stir until they’re evenly coated.
The mixture will begin thickening as you stir, so have your baking sheet ready.
Step 7: Shape the Candies
Use a tablespoon or small cookie scoop to drop generous spoonfuls of the pecan mixture onto the prepared baking sheet. Leave a little space between each portion.
Try to distribute the pecan halves evenly so each candy has plenty of nuts.
Tip: If the mixture becomes too thick to scoop, return the pan to very low heat briefly to loosen it. Avoid overheating it.
Step 8: Let the Pralines Cool
Allow the candies to cool at room temperature for approximately 30–45 minutes, or until firm enough to handle.
They should develop set edges while retaining their characteristic rich, slightly glossy appearance.
Tip: Let them cool naturally rather than rushing the process in the refrigerator, which may contribute to a sticky texture.
Step 9: Store and Enjoy
Once completely cooled, gently remove the pralines from the parchment paper. Place them in an airtight container, separating layers with parchment paper to help prevent sticking.
For the best quality, enjoy them within 5–7 days.
Delicious Ways to Serve Pecan Pralines
These sweet, nutty candies are wonderful on their own, but they can also complement other treats.
- With coffee: The slightly bitter flavor of coffee balances the candy’s sweetness.
- With cold milk: A classic pairing for a rich homemade dessert.
- On a holiday dessert platter: Arrange them alongside cookies, brownies, and other homemade sweets.
- As homemade gifts: Place the pralines in a decorative tin with parchment between the layers.
- Over ice cream: Crumble a praline over vanilla ice cream for extra sweetness and crunch.
- With hot tea: Enjoy them as a simple afternoon treat.
- At family gatherings: Serve them during holidays, parties, and special occasions.
- With fresh fruit: Pair them with fruit for a refreshing contrast.
- With Southern sweet tea: Enjoy a little taste of Southern hospitality.
Easy Variations to Try
Once you’ve mastered the basic recipe, there are several ways to experiment with different flavors.
Try Different Nuts
Pecans are the traditional choice, but other nuts can create interesting variations.
- Walnuts: Offer an earthy flavor with a slight bitterness.
- Pistachios: Add a distinctive flavor and a touch of color.
- Almonds: Provide a mild, crunchy alternative.
- Cashews: Bring a naturally buttery taste.
Keep in mind that changing the nuts will alter the traditional praline flavor.
Add Extra Flavor
For a slightly different twist, consider these optional additions:
- Vanilla extract: Adds warmth and sweetness.
- Butter: A tablespoon can provide extra richness.
- Bourbon: Introduces a deeper flavor for an adult-oriented variation.
- Cinnamon: Adds a warm, comforting note.
- Sea salt: Creates a pleasant sweet-and-salty contrast.
- Chocolate: Drizzle melted chocolate over the cooled candies.
For the best results, introduce additional ingredients carefully so they don’t interfere with the candy’s texture.
Experiment With the Cream
Heavy cream is the recommended option for this recipe. Half-and-half, coconut cream, or evaporated milk may produce different results, so substitutions can affect the final consistency.
For a dairy-free variation, coconut cream may be worth experimenting with, although the finished candy may have a different flavor and texture.
Add a Little Spice
If you enjoy a hint of warmth, try adding a small pinch of one of the following:
- Cayenne pepper for a little heat.
- Cinnamon for a warm, sweet flavor.
- Nutmeg for a subtle, aromatic touch.
Start with a small amount so the spices don’t overpower the pecans.
Are Pecan Pralines Gluten-Free?
The three main ingredients in this recipe are naturally gluten-free. Check product labels if you’re preparing the candy for someone who needs to avoid gluten.
Can You Make Them Vegan?
You can experiment with coconut cream as a replacement for heavy cream. However, the texture and setting behavior may differ from the traditional version, so the result may require some adjustment.
Helpful Tips for Perfect Pralines
A few simple techniques can make the cooking process easier and help you get better results.
- Choose a heavy-bottomed saucepan. Even heat distribution helps prevent hot spots.
- Prepare everything before you begin. The candy mixture can set quickly.
- Avoid excessive stirring. Once the sugar has dissolved, stir as little as possible.
- Watch the caramel carefully. Too much heat or too much cooking can burn the mixture.
- Use the cold-water test. Check for the soft-ball stage if you don’t have a thermometer.
- Work quickly after adding the pecans. The mixture thickens as it cools.
- Use a cookie scoop or tablespoon. This makes it easier to create evenly sized candies.
- Allow enough cooling time. Let the pralines firm up at room temperature.
- Separate the layers with parchment. This helps keep the candies from sticking together.
- Store them properly. An airtight container helps maintain their quality.
Frequently Asked Questions
Can I use a different type of sugar?
This recipe is designed for granulated sugar. Substituting another type of sugar may change how the candy cooks and sets.
Can I replace heavy cream with regular milk?
Heavy cream is recommended because its higher fat content contributes to the rich texture. Regular milk may produce a different result.
Can I use a candy thermometer?
Yes. The soft-ball stage is generally reached at approximately 235°F–240°F.
How do I know when the mixture is ready without a thermometer?
Use the cold-water test. Drop a small amount of the mixture into cold water and check whether it forms a soft ball that holds its shape when gently pressed.
How long do homemade pralines last?
For the best quality, keep them in an airtight container at room temperature and enjoy them within 5–7 days.
Can I freeze pecan pralines?
Freezing isn’t recommended for this recipe because thawing may affect their texture and make them sticky.
Why did my pralines turn grainy?
Sugar crystallization may be the cause. Avoid excessive stirring after the sugar dissolves, and try not to scrape crystallized sugar from the sides of the saucepan into the mixture.
Why didn’t my pralines set properly?
The mixture may not have reached the correct cooking stage. Return it to the heat and continue cooking carefully, testing again until it forms a soft ball in cold water.
What causes pralines to burn?
Excessive heat or overcooking can cause the mixture to become too dark and develop a burnt flavor. Monitor the temperature and color closely throughout cooking.
Can I add butter or vanilla?
Yes. A tablespoon of butter can add richness, while about a teaspoon of vanilla extract can provide additional flavor. These additions may slightly affect the finished recipe.
Are these pralines gluten-free?
The recipe is naturally gluten-free when prepared with suitable ingredients that haven’t been contaminated with gluten.
Storage and Make-Ahead Instructions
Room temperature: Store the cooled pralines in an airtight tin or container, with parchment paper between the layers. Aim to enjoy them within 5–7 days.
Refrigerator: Refrigeration isn’t recommended for this recipe because moisture and temperature changes may affect the candy’s texture.
Freezer: Freezing is not recommended, as the pralines may become sticky after thawing.
Reheating: These candies are best enjoyed at room temperature and generally don’t need reheating.
Make-Ahead Tips
- Prepare the pecans early: If desired, lightly toast them up to three days ahead and store them in an airtight container.
- Make the candy in advance: Prepare the pralines up to five days before serving and store them properly.
- Prepare gifts ahead of time: Arrange the cooled candies in decorative tins, separating each layer with parchment paper.
A Sweet Taste of Southern Tradition
Sometimes the simplest recipes become the most memorable. These Southern pecan pralines bring together sugar, cream, and pecans to create a classic homemade candy with a rich flavor and satisfying crunch.
They’re easy to share, lovely to give as gifts, and right at home on a holiday dessert table. Whether you’re making them for a family celebration or simply craving an old-fashioned sweet, these pralines offer a comforting taste of Southern tradition.
Keep the ingredients on hand, follow the cooking stages carefully, and you’ll have a homemade treat that’s perfect for sharing.
Recipe Summary
- Recipe: Southern 3-Ingredient Pecan Pralines
- Rating: 5 out of 5
- Difficulty: Moderate
- Prep time: 5 minutes
- Cooking time: 15–20 minutes
- Cooling time: 30–45 minutes
- Total time: Approximately 1 hour
- Yield: 18–24 pralines
- Ingredients: 3
- Best for: Holiday gifts, cookie exchanges, dessert platters, and homemade Southern candy
- Cleanup: Minimal, using one saucepan and one baking sheet
- Storage: Airtight container at room temperature for up to one week
Enjoy your homemade Southern pecan pralines!